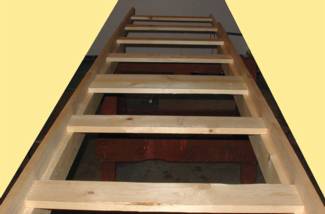
Bench work is done with 1"x4" boards. There are two sections pictured, each is 2' wide x 6' long. Cross boards are 18" on center, set 1.5" down from top to hold that thickness of foam.

This is a view of the cross section of the foam and how it fits the benchwork.

The foam and 1/4"protective ends are attached to the benchwork with Mountain Modelcraft Base Paste. You can read about it at the home page.

Masking tape was used to lay out the track plan. It can be looked at and modified very easily.

Instead of using HO ga. cork I prefer "N" ga cork. I use 3 strips and invert the center strip so that the tapered edge is facing down. I do this because I do not want the high roadbed look that HO ga. cork gives, also the "N" ga. cork is slightly wider and in my opinion creates a much nicer looking end result. The cork I'm using is Midwest brand #3019 "N" ga. cork.

Using My masking tape as a guide I brushed a coat of Base Paste along the edge and positioned the cork roadbed into it. I then removed the tape and added the remaining 2 strips of cork.

It only takes a few minuts to place the cork, one more strip and it'll be complete.

I'm using Atlas code 83 track for this project, turnouts are all #6. I've sanded the edges of the cork to insure ballast will look good. Track is held in place with Base Paste adhesive and pins. Allow a couple hours drying time.
This layout is being constructed and reported to this web site as it progresses. Stop past every couple days and check on the progress! Thanks for looking-- Dave Conrad Visit the Mountain Modelcraft home page to learn more